Online Storyteller Support
Organization Owners
Organization owner pages
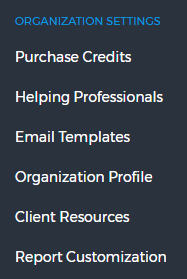
Helping professionals who are not organization owners can only login as clients, add clients and edit their helping professional profile. Organization owners can manage:
- Purchase Credits
- Helping professional accounts
- Email templates
- The organization profile
- Client resources
- Report Customization
The organization owner can be changed on the page.
Clients
The client section is the main helping professional page, it allows you (the helping professional) to manage, view and edit the clients within your organization.
Searching for clients
When you first come to the client page no clients are displayed (this is to prevent clients you are working with in person from seeing the names of your other clients). You can view your clients in one of two ways:
-
Search for the clients name or email in the search box.

Client search box
-
Click View My Clients or View All Clients. This will display all clients assigned to you or all clients within the entire organization.

View all client buttons
Helping professional client account
As a helping professional you have your own client account so you can add your own stories, create a Career Statement and use the One Life Storyteller to help manage your own career. This is also a great place to get familiar with the system.
To access your client account click My Client Account in the left hand menu.
Client status
All clients will have one of 3 statuses – this is displayed on the search page and when editing the client.
- Invited

Invited status clientClients in invited status have been sent an email inviting them to setup an account, but they have not yet done so. Until a client has activated their account they cannot login. Click the Resend Registration Email link to resend the invitation email.
To invite a client click the Invite Client button and enter their email address. Inviting a client uses one of your Narrative Assessment Credits, if the client never activates their account you can have your credit refunded by clicking the Uninvite button.
If your client didn't receive the invitation email check that the clients email is correct in the edit client page, resend the invitation email and askthe client to check their junk/spam mail folder.
-
Active
Active clients are clients who are fully registered and have full access to the system.
-
Archived
Archived clients cannot login to the system and you cannot login as archived clients. Archiving a client allow you to restrict their access while preserving their data. Archived clients can be reactivated at anytime.
Editing clients
The edit client page has 3 sections: Details, Assign Resources and Transfer Clients
-
Details
The client details section allows you to edit the client profile, account expiry and client status.
-
Assign Resources
The assign resources section allows you to assign resources to a client which will show up in the Questions & Notes section of their account. Resources are divided into two sections, organization resources & One Life Tools resources. Organization resources are those resources which were uploaded by the organization owner in the section. To assign a resource to a client simply click on the check box next to the resource name, it will then show up in the Questions & Notes section of the clients account.
-
Transfer Clients
Use this page to transfer a client to another helping professional within your organization.
- Assigned
The Narrative Assessment is assigned to the client. When the client logs in they will be brought to the start of the assessment.
- In progess
The client has started, but not completed, the narrative assessment. When the client logs in they will be brought to where they left off in the assessment.
- Completed
The client has completed the narrative assessment. When the client logs in they will be brought to their Online Storyteller dashboard.
- Skipped
You have skipped the Narrative Assessment for this client, click re-assign if this was an accident. When the client logs in they will be brought to their Online Storyteller dashboard.
Client account expiry
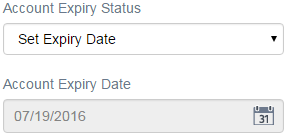
Set an expiry date on client accounts to give
them a limited period of access
Use the client account expiry if you want clients to have a limited period of access to the system. Some organizations use this if they are billing clients for a set period of access.
Add an expiry date in the client details page. On the date you set the clients account will be changed to archived status. The client account is not deleted, it is just changed to archived status so the client cannot login. You can always reactivate the client.
Narrative Assessment status
Set an expiry date on client accounts to give
them a limited period of access
By default, it is manditory for all clients to complete the Narrative Assessment before gaining full access to the system. This ensures clients have a basic understanding of the Online Storyteller and narrative model before being given full access.
You as a helping professional can choose to have your clients skip the Narrative Assessment if you prefer to guide them through the Online Storyteller yourself.
There are four Narrative Assessment status'
Regardless of the clients status, you as a helping professional can login directly to the clients dashboard. XXXXXXXXXXXXXXXXXWHAT IS POPUP LIKEXXXXXXXXXXXXXXXXXX. This allows you to work with your client using the Online Storyteller during your first session, then assign the Narrative Assessment to do at home.
You skip the narrative assessment for a client on the edit client page.
If your client didn't receive the invitation email check that the clients email is correct in the edit client page, resend the invitation email and askthe client to check their junk/spam mail folder.
Login as a client
When working with a client you don't need to have the password for their account, you can login to any clients account directly through your helping professional dashboard.

Login as the client
to view their account
To login as a client find the client in the clients page, then click Login As for the client account you want to view. This will open the client dashboard for that client (exactly as the client would see it). You can then make any changes to the clients Career Sketch, Career Statement, Exploration Plan, etc…
XXXXXXXXXXXXXXXXXXXXXXXXXXXXXXXXXXX
Click the green arrow to return to your
helping professional dashboard
When logged in as a client the top black bar from the helping professional dashboard is still displayed, to go back to your helping professional dashboard simply click the back arrow.
Adding a client

Add a new client button
To add a new client to your organization click the Add Client button on the client page. Fill in all the client information – the birth year and phone numbers are both optional fields which the client can fill in at a later date.
You can also choose to set an account expiry date when adding a client.
Once you add a new client they will be in active status and you can login as the client immediately. An activation email will also be sent to the client which will allow them to set a password and complete their registration. Optionally, you can help clients with this step by clicking edit client and manually adding a password for the client.
Report Customization
Organizations have the option to customize the Narrative Assessment reports Next Steps section. You can include any information you want your clients to see including how to schedule a meeting to debrief the Narrative Assessment report.
To use this optional feature simply enter the information you want the client to see into the Report Customization page. For help with initial setup you can also contact us.
Helping Professional Profile
The profile page allows you to change some details of your helping professional account. You can update your email address, name, phone number, password and profile picture.
The show profile on client dashboard check box determines whether the information in your helping professional profile is displayed on the clients dashboard.(Note: This feature is not yet built; you can set the show profile on client dashboard selection, but nothing will be displayed on the clients dashboard until a future update of the One Life Storyteller)
Helping Professionals
This section is only accessible to the organization owner.
The Helping Professionals section allows the organization owner to manage the helping professional accounts within the organization.
The main page of the helping professionals section displays all helping professionals within the organization.
Edit Helping Professional
Edit a helping professional by clicking the Edit button for that row. You can make changes to the helping professional account under the Details tab, or view all clients assigned to that helping professional under the Clients tab.
Add Helping Professional
To add a helping professional click the Add Helping Professional button and fill in the details. If you have reached the helping professional limit for your organization you will not be able to access this page.
Email Templates
This section is only accessible to the organization owner.
Email templates allow you to customize the emails that are sent to clients from the One Life Storyteller on behalf of your organization. There are 2 email templates Invitation email and Welcome email.
- Invitation email
Sent when a new client is added to the system, this email contains the registration link which allows the user to set their password and confirm their email. -
Welcome email
Sent to the user after they complete the registration process initiated with the Invitation email.
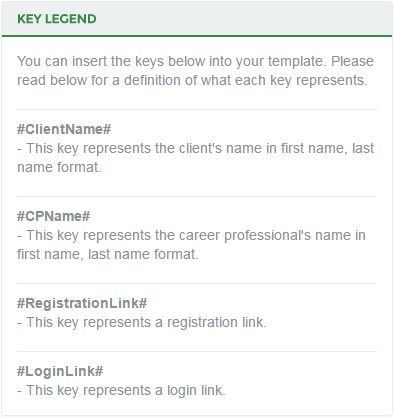
Email templates key legend
Editing email templates
To edit the email templates simply click on the one you wish to edit and edit the text in the Template Content text box. Dynamic values can be placed into the email by using the keys outlined in the key legend. For example: "Hi #ClientName" will show up as "Hi John Smith" if that is the clients name.
IMPORTANT: The registration link necessary for the client to complete their registration process is in the Invitation email, therefore the #RegistrationLink# key must be present or your clients will not be able to complete their registration.
Organization Profile
This section is only accessible to the organization owner.
Information related to your organizations account can be updated here, this information is only used by One Life Tools and is never shared with your clients or any third parties.
On this page you can also update which helping professional is designated as the organization owner.
Client Resources
This section is only accessible to the organization owner.
URL links or downloadable files can be assigned to clients, these will show in the clients Questions & Notes section.
You can either add your own resources or assign the preloaded One Life Tools resources. To add new resources go to the client resources section and click the Add Resource button. Fill in the title of the resource, add a brief description and either upload a file or enter a URL of your resource (it could be a Youtube video, blog post or any other link). The order number determines what position the resource will display in, with 0 displaying at the top and then ordered in chronologically descending order. Especially if you are only adding a few resources you can leave the order number field blank and resources will display in the order added.
To assign a resource go to the clients page, edit the client you want to assign a resource to and click on the Assign Resources tab for that client. The resources are divided into two sections, organization resources and One Life Tools resources. Organization resources are those resources which were added by the organization owner. To assign a resource to a client simply click on the checkbox next to the resource name, it will then show up in the Questions & Notes section of the clients account.